craftaliciousme craftaliciousme
  • Home
  • Printable Calendar 2023 {Freebie}
  • Books
  • Just Life
  • Tutorials
  • Meet Me
    • 101 things in 1000 days – my personal bucket list part II
    • Read Around the World – one book from every country
  • Home
  • Printable Calendar 2023 {Freebie}
  • Books
  • Just Life
  • Tutorials
  • Meet Me
    • 101 things in 1000 days – my personal bucket list part II
    • Read Around the World – one book from every country
  • Crafting

Dip Dyed Lace Necklace {Tutorial}

  • Tobia
  • October 16, 2014
  • 4 comments
  • 2 minute read
Total
0
Shares
0
0
0
0
0

If you are a fellow Pinterest addict you’ll probably came across jewelry and accessories made of lace. However I’ve pondering this idea longer than I have my Pinterest account – I just didn’t know what to use to make it stiff. Duh me, I say.

dip deyed lace necklace

  • This is what you need:
  • Lace
  • Scissors
  • Textile stiffener*
  • Brush – make sure there is no color in it (no, I do not talk from experience!)
  • Chain & eyelets
  • Tools

In my case I dip dyed the lace before, to achieve an ombré look. I threw in the first row of lace flowers and let them sit for 10 minutes, adding the next lace flowers and then 10 min later the last. However adjust accordingly to your desired color.

What I learned: prewash your lace! Mine had something in it, what made color absorbtion somewhat difficult. This will also ensure an evenly dyed result.

Now you have to let it dry. Best over night or in my case a couple days.

Next comes the textile stiffening. Fill a bit of the stiffener in a little lid or something. I wouldn’t recommend working out of the big pot. Evenly spread the stiffener with a brush onto the lace. Make sure to work quick put precisely. Don’t leave out small holes or deeper layers. Let sit for a bit, then turn upside down and repeat on the other side. Leave overnight to let dry.

dip deyed lace necklace

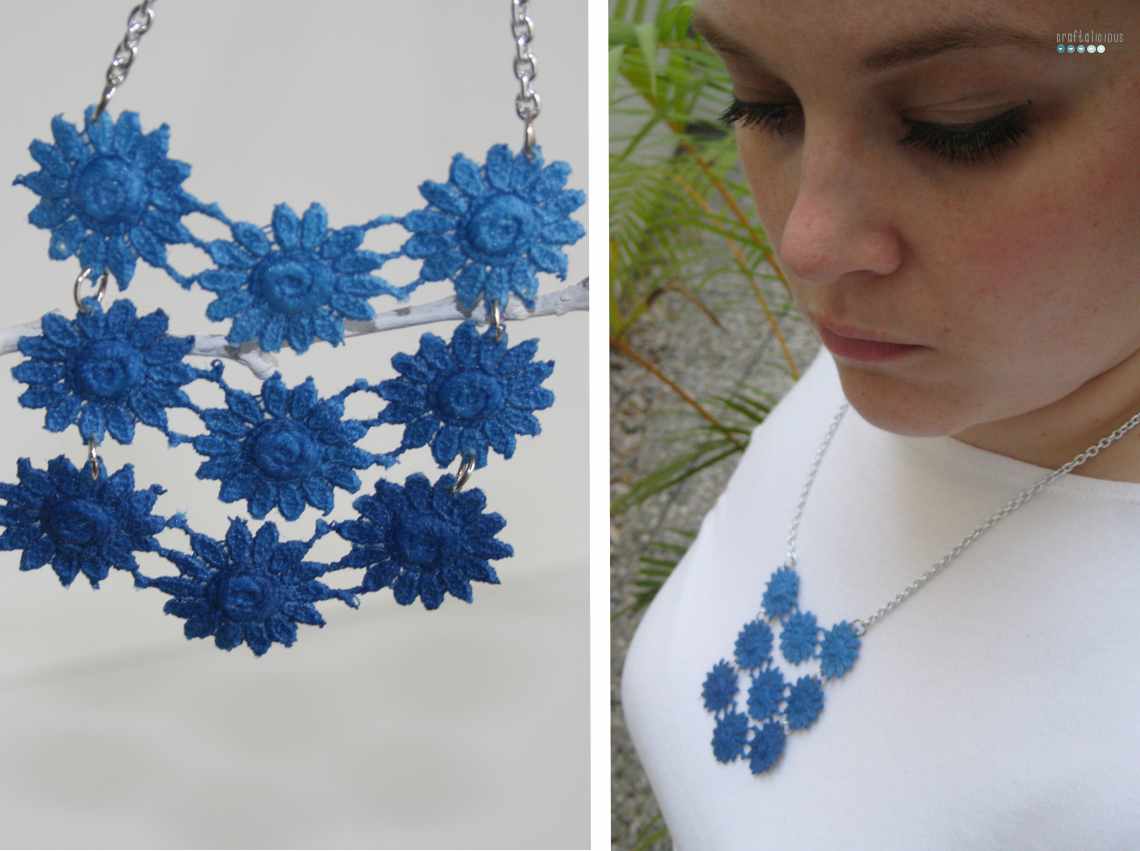
Now you can start the fun part. Work in the rings to connect the lace parts. Depending on your lace it could be better to work them in before you use the stiffener. I would do that with mine as it is quite tightly woven. Attach a chain and you are done. An easy project however it needs time. Perfect to do throughout the week after work.

I’d love to see your version so don’t be shy in sharing. For more jewelry ideas check out my Pinterest board.

I am glad I had the chance to finally make something for myself again. That is way I’ll submit it to the RUMS roundup.

Cheers, Tobia

*affiliate link (more info here)

Related Topics
  • DIY
  • jewelry
Previous Article
  • Crafting

Lets make a shoe {denim espadrilles}

  • Tobia
  • September 2, 2014
Read Post
Next Article
star garland
  • Crafting

Starry Night #1 * Star Garland * DIY Advent Calendar

  • Tobia
  • December 1, 2014
Read Post
4 comments
  1. Nicole says:
    October 16, 2014 at 11:00 am

    Hi Tobia,
    wirklich schön geworden! Ich will auch so eins haben! ;-)
    Liebe Grüße, Nicole

    Reply
    1. Tobia says:
      October 16, 2014 at 7:04 pm

      Liebe Nicole, dann müssen wir uns mal unterhalten ☺️

      Reply
  2. Jutta von Kreativfieber says:
    October 20, 2014 at 3:31 pm

    Die Kette ist wirklich total schön! Und danke auch für die Kette in dem Päckchen :*

    Reply
    1. Tobia says:
      October 20, 2014 at 8:08 pm

      Gerne doch… und Danke ;-)

      Reply

Leave a Reply Cancel reply

Your email address will not be published. Required fields are marked *

I accept that my given data and my IP address is sent to a server in the USA only for the purpose of spam prevention through the Akismet program.More information on Akismet and GDPR.

CommentLuv badgeShow more posts

This site uses Akismet to reduce spam. Learn how your comment data is processed.

about
About Me
Welcome to my internet home.
Blogging for ten years about creativity, books and baked goods. All while goal setting, seeking a creative life and sharing my thoughts and life as an introvert in Germany's capital.
Come join me and let's be friends.
Tag Cloud
10 Things advent art Berlin blogging blog party books breakfast cake chocolate coffee cold color me happy craft room decoration DIY drinks fall Finland gifts happiness review ideas inspiration jewelry kranz lemonade party listmaking NaBloPoMo recipe recycle quick tip recycling refashion resolution reviews soup spring stars summer thoughts travel winter winter wedding wreath x-mas zero waste
Categories
Trending Posts
  • how i prepare for the 100 day project
    Just Life
    How I prepare for the 100 Day Project
  • sorbian easter eggs tutorial
    Crafting , Tutorials
    Sorbian Easter Eggs {Tutorial}
  • Kermakakku - Finnish Sour Cream Cake
    Baking
    Kermakakku – Finnish Sour Cream Cake
Recent Comments
  • Tobia on Magic January – A Monthly Recap
  • Sarah on Magic January – A Monthly Recap
  • Tobia on wired Words {Recycle Quick Tip #16 }
Found some magic on a rainy, cold, windy, sick day.
Road tripping through Germany 🇩🇪
2023 starts with a four day trade fair in Munich that was supposed to be a 2-day gig. Very busy and so my content production skills moved aside and I took the role of sales person, coffee girl, trend scout and squeezed in a bit photography.
New habit loading: Wednesday Morning Walk.
Bye bye 2022.
Still Christmas around here.
  • Imprint
  • Data Policy
© craftaliciousme 2013-2023
Read posts from previous years

Input your search keywords and press Enter.