Hello,
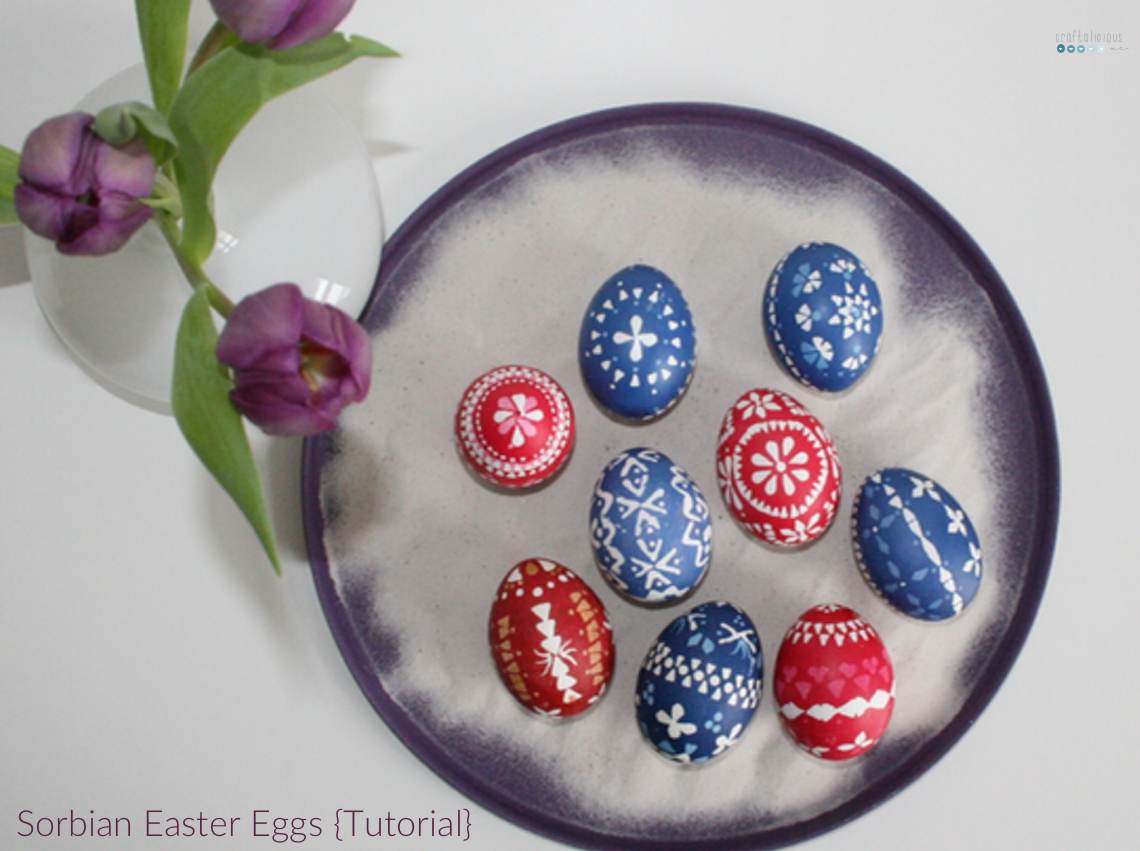
I have a confession to make: I am not big into Easter decorations at all. Heck I don’t even own Easter decorations. Usually it’s just a pot of flowers and that’s about it.
I grew up with a one simple decoration. Every year we would cut some birch twigs and put them in a huge vase. On Saturday before Easter we would then hang easter eggs to decorate. And as I grew up in a area in Germany where there is a minority called Sorbs living, most of our eggs where made in their traditional way – at least that’s how I remember.
Since last year I was having the urge to give this craft another try. I remember we did it as kids but the eggs probably looked horrible. Maybe I can find some on this year’s Easter bouquet.
The sorbs have four different techniques for decorating their easter eggs but I only know how to do the wax batik technique. Wax is applied with special quills to the eggs shell and in various usually very detailed and complicated patterns. Then it is dyed. Different colors can be achieved by dying in many different steps and in-between applying more wax.
To make Sorbian Easter Eggs with the wax batik technique a bit of preparation required though.
Eggs.
I recommend doing this technique on blown out eggs. It is time consuming and it would be sad to have them broken on Easter morning. However it’s up to you but make sure to boil them before starting to craft. Usually the eggs have stamps on them that need to go. With a bit of soap and a brush or sponge you usually get it off. You could also use nail polish remover but you really need to wash the eggs carefully afterwards otherwise the dye will not stick.
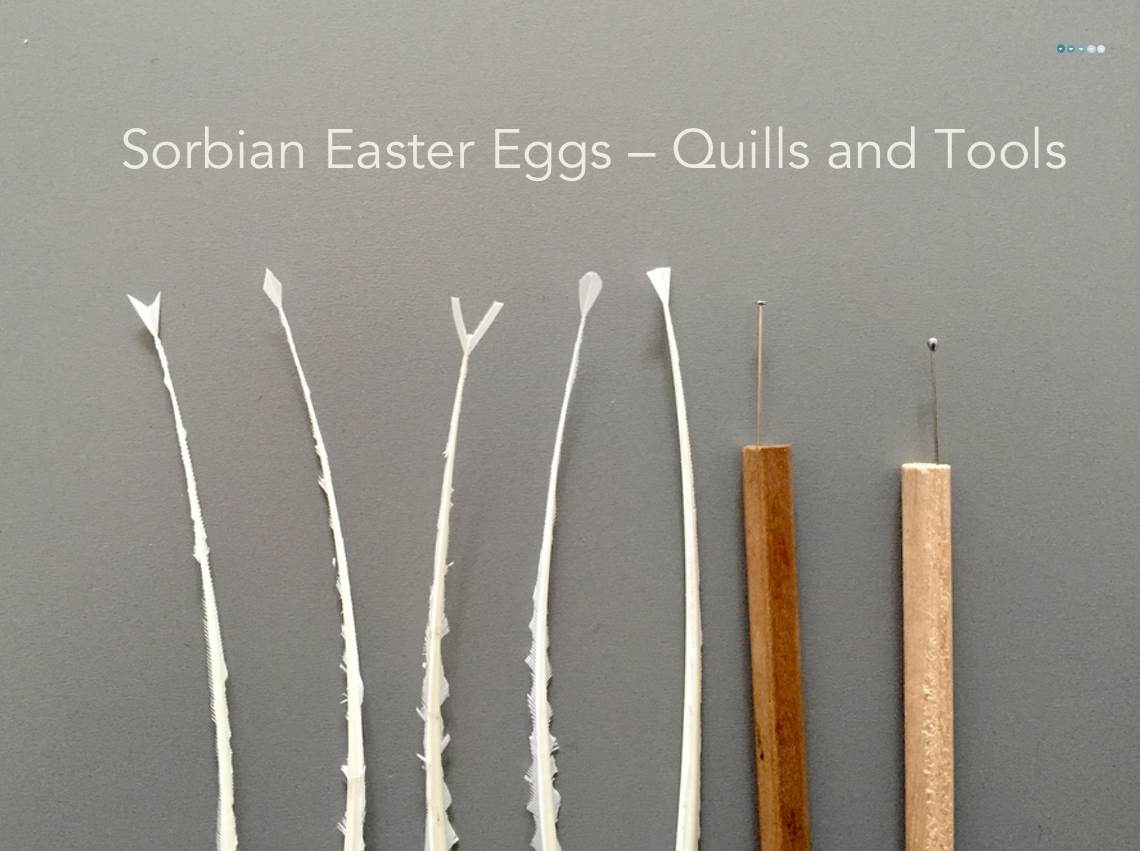
Tools.
Feathers are your drawing or better stamping tool for this craft. It’s important to get feather from the wings and goose feathers* are recommended. Then you cut of most of the thin hairlike thingies left and right of the bone of the feather until you have only the tip left. (Sorry not sure how that is called in English but you hopefully know what I mean.) Now you cut your shape. (I just read that a cutter is better suited than scissors… Well next time…) For basic patterns you would need a triangle, a drop, diamond and a arrow shape. The dots are made with the heads of a pin.
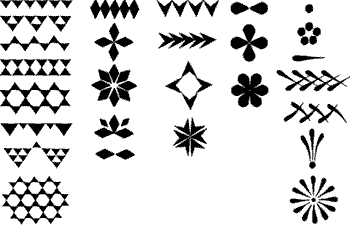
In the picture below you can see what kind of (traditional) shapes can be made with those basic tools:
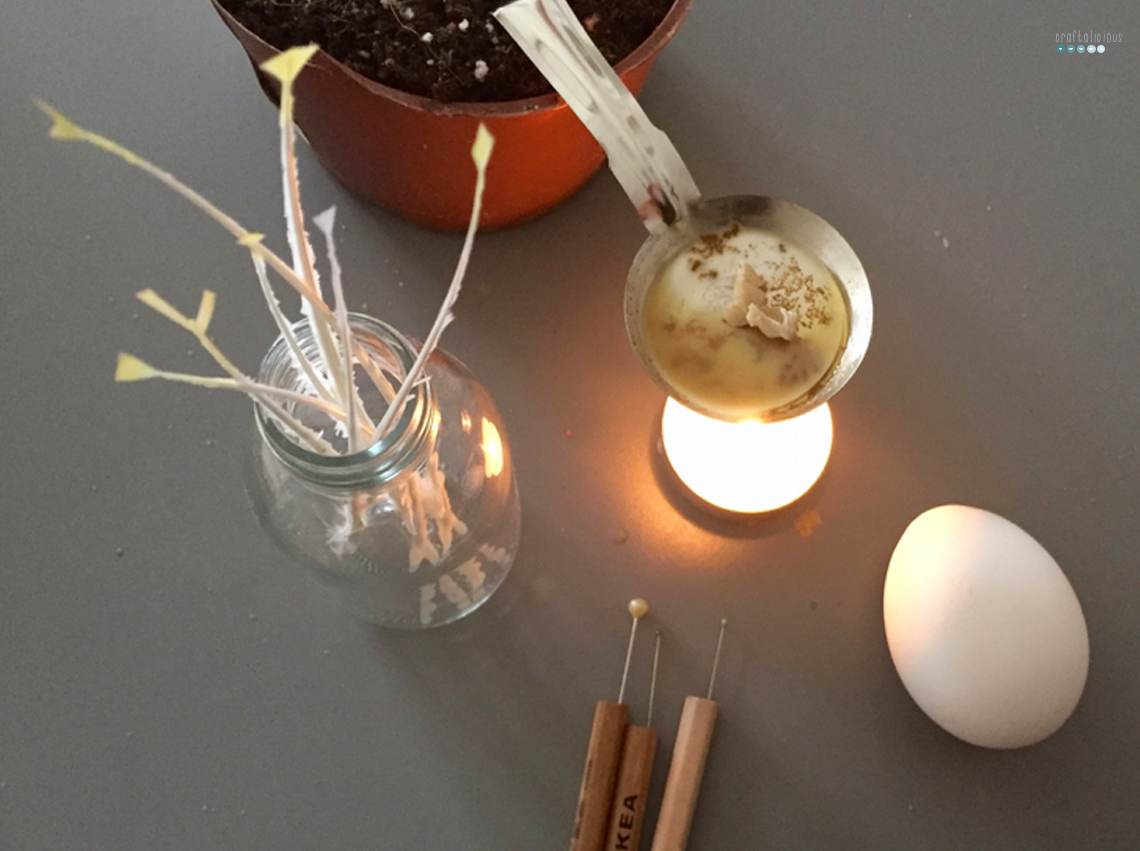
Once you have the quills you need the wax. It is important to use a mixture of regular candle wax and bees wax. The bees wax makes it more flexible to apply and also easier to get off as it melts faster. You also need a tinplate spoon. I used mine out of New Years Eve lead-pouring kit. Then set up you station by curving the spoon in a 90° angle and pushing it into a flower pot. Place a tea light underneath and add a bit of wax to the spoon. Now you are ready to go.
How to do Sorbian Easter Eggs.
Your first egg will probably look horrible. Its ok because it’s to learn how the quill works. It is important to work fast and with a steady hand. Not always easy.
- Put your quill to the wax and make sure its fully soaked (first time) or fully melted (after already using it). You can see tiny little bubbles.
- Now press the quill to the shell and remove immediately. I found it to be practical to remove the tip by slightly moving it towards your body (always making sure you don’t mess up the pattern). If you let the quill rest too long the wax will melt and then you have to jerk the quill away and usually this results in tiny wax drops all over the egg shell.
- When you are done with your pattern you can dye your egg. Use only cold dye otherwise the wax will melt. If you are planning to do a two colored egg you only need to have it in the dye a very short time. Otherwise the difference is hard to see.
The following picture shows the steps for a simple wax batik egg with only one dyeing:
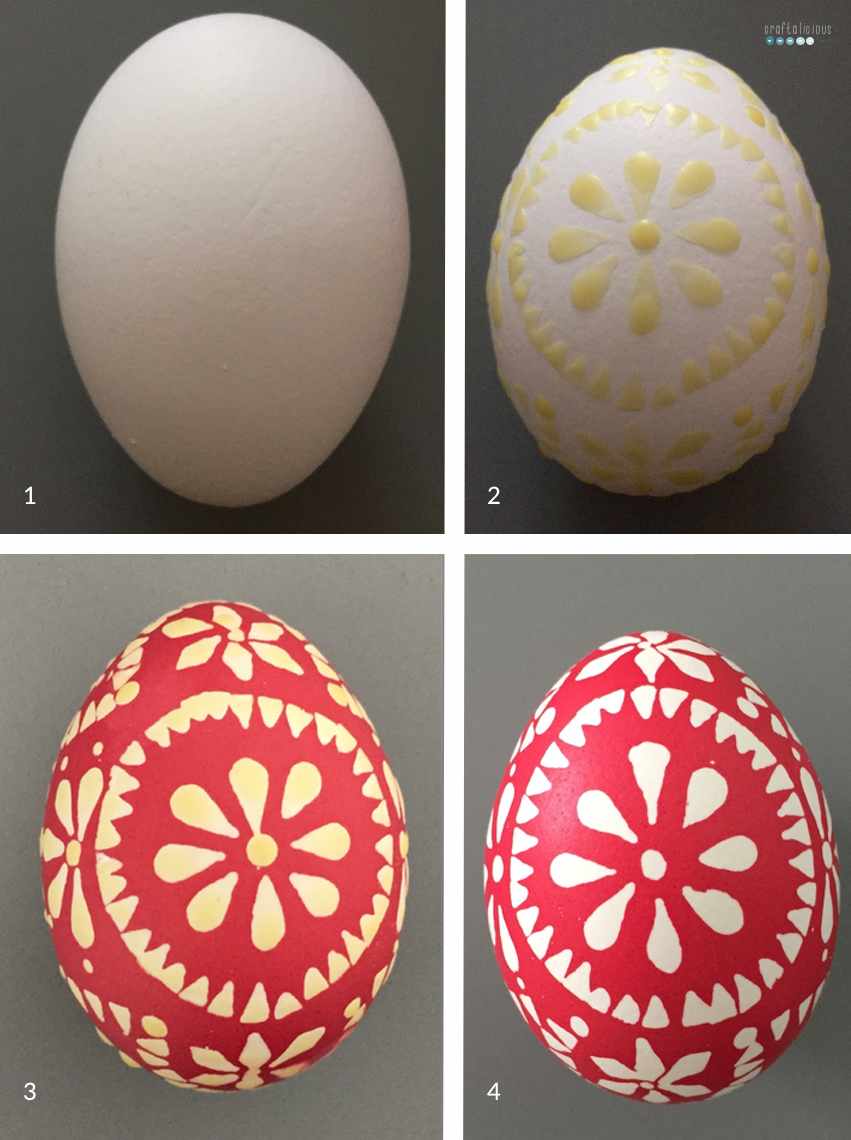 1. your cleaned egg // 2. wax is applied // 3. after dyeing // 4. after wax is removed
And here you can see the steps for a two colored egg.
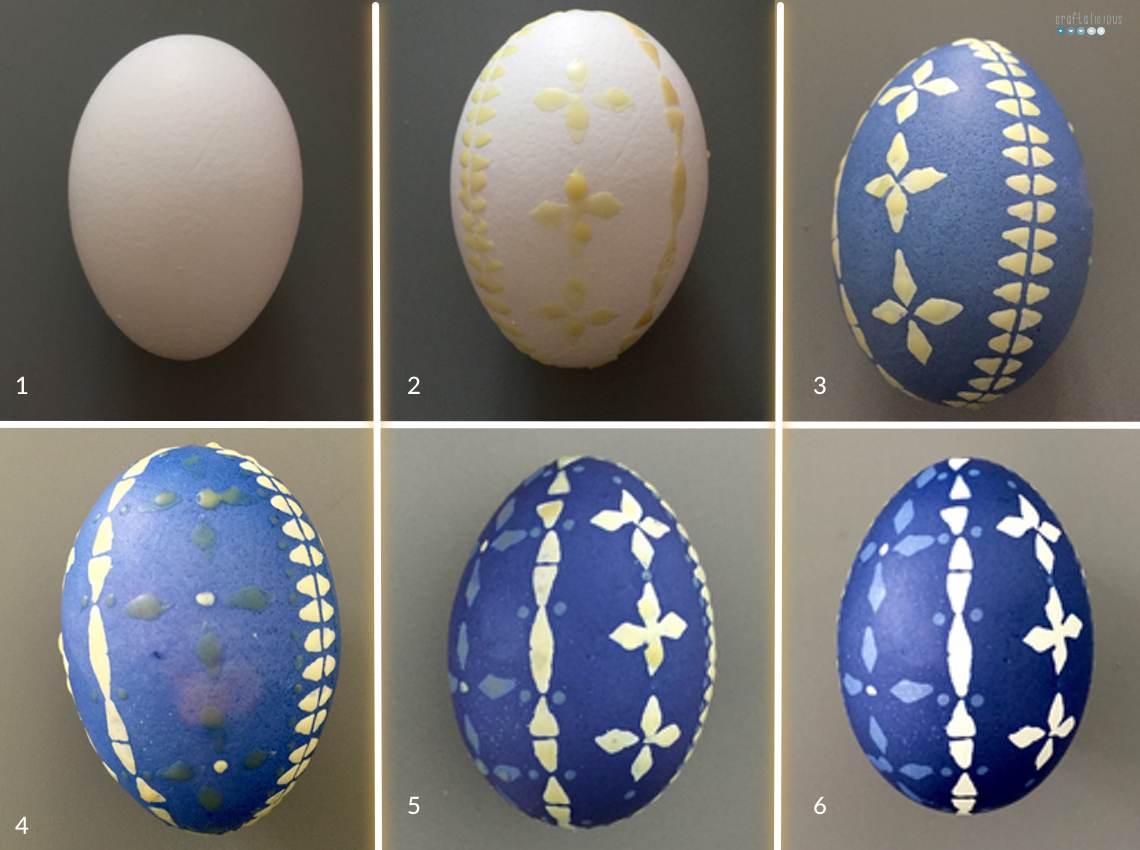 1. your cleaned egg // 2. first coat of wax applied // 3. after first dyeing // 4. second coat of wax applied on dyed surface // 5. after second dyeing // 6. after wax is removed
You get the idea. You can go with multiple dyeing rounds when your pattern requires it. My brain however can only think ahead two rounds.
4. Once you are done with your egg you can start to remove the wax. We used to do it over an gas flame but this time we put the eggs in the oven. Preheat oven to 50°C/120°F, put paper towels on your grate or baking pan and add eggs for about 3 minutes. Wipe of melted wax with an old rag. Tada and you just made your first Sorbian Easter Egg.
How to do patterns.
This is the hard part, something coming with practice I guess. However I found it useful to divide up your egg by either going in a circle from top to bottom or by making a line at the thickest part of the egg. This gives some direction to help with the symmetry. And symmetry is key when it comes to Sorbian eggs. For more complicated patterns I thought it was easier starting from the middle and working your way out of the pattern. I saw online that some people predraw the patterns with a pencil. I don’t understand how this works as you can’t get it of once the wax is covering it. Maybe after dying but that requires the dye covers the rest of the predrawing. Well you figure it out and let me know.
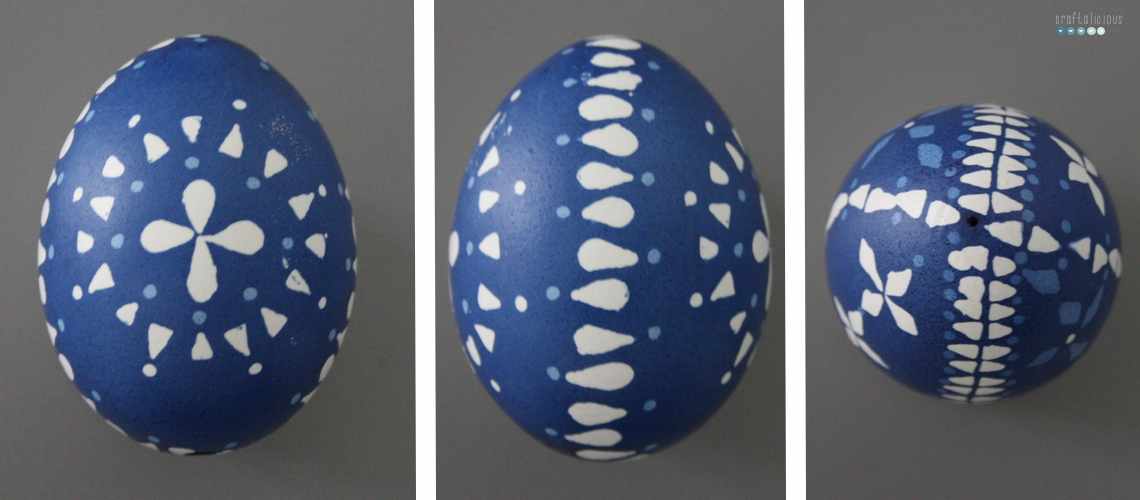
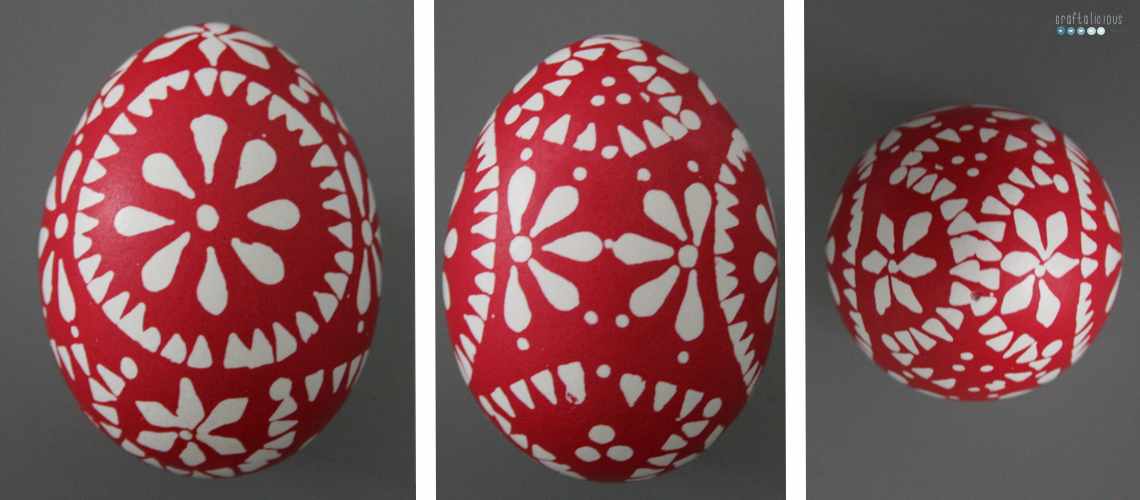
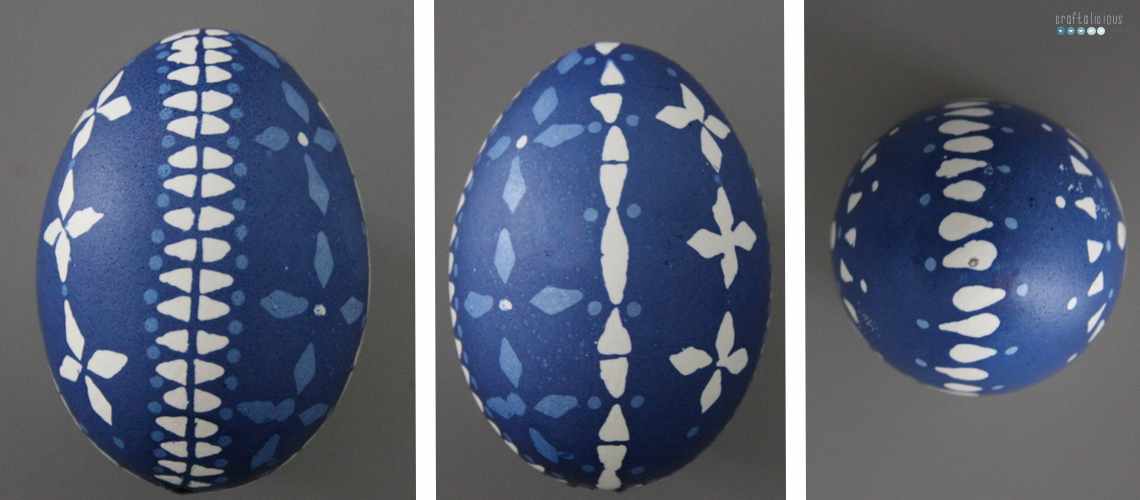
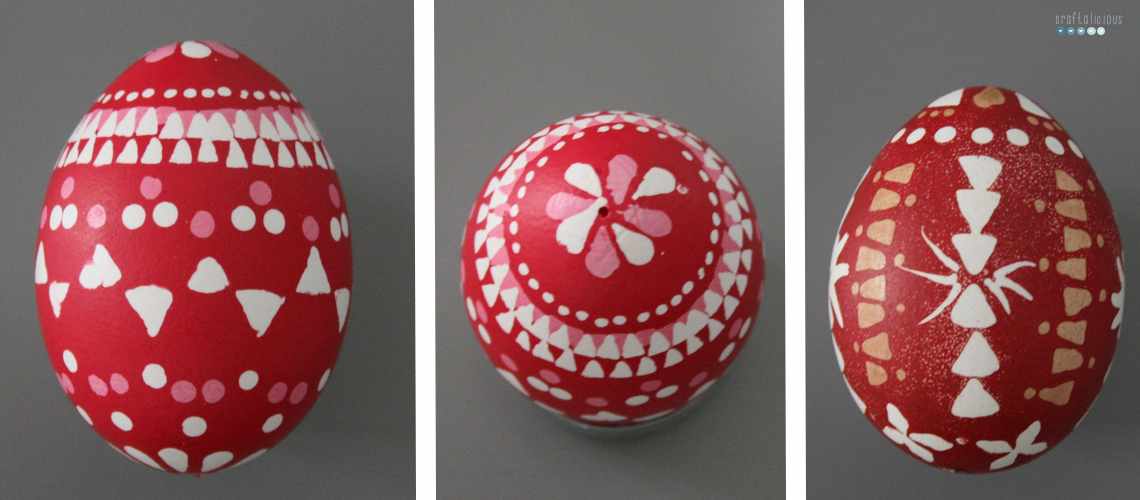
Here are a few patterns I have tried:
If you need more inspiration and ideas follow my Pinterest Board.
Follow Tobia’s board SPRING :: EASTER on Pinterest.
I found this craft amazingly meditative and I am really hooked. I am pretty sure we have a few more days of scrambled eggs ahead of us.
What do you think, will you give it a try or is it too complicated for you? How do you dye your easter eggs?
Happy wax dipping,
Tobia
PS. If you want to read a bit more about the traditions and helpful tipps check out www.sorbische-ostereier.de (only German)
*affiliate link (more info here)
4 comments
Wow! Die sehen echt genial aus! Nicht gerade wenig Arbeit, aber die scheint sich auf jeden Fall auszuzahlen.
Ich wünsche dir schöne Osterfeiertage <3
Liebe Grüße,
Filiz
Schön, dass sie dir gefallen. Ja es ist etwas Aufwand aber die vergeht wie im Flug weil es so entspannend ist. Ich habe sogar gekochte Eier gemacht weil ich nicht mehr wusste wohin mit all den ausgeblasenen.
Liebe Tobia,
es ist mir eine große Freude diese schöne Eierkunst zu sehen. Das erinnert an Kindheitstagen, denn es gab sie jedes Jahr. Anfangs heimlich von der Mama in den Abendstunden gefertigt, durften wir irgendwann mitmachen. Die Arbeit ist nicht zu unterschätzen, aber es ist so entspannend. Leider komme ich nicht mehr regelmäßig dazu, die Tradition fortzuführen, der Bienenwachs ist aber schon gekauft und Federn sind immer im Haus. Hoffentlich findet sich ein “Moment” :-)
Deine wunderschönen Ergebnisse spornen mich an. Du hast so ein ruhiges Händchen und deine Muster sind definitv keine Anfängermotive. Toll. Einfach toll!!!
Echte Handarbeit und nicht nur weißer Edding :-) Meine bewundernde Anerkennung für deine Arbeit!
Liebste Wochenendgrüße an dich,
Sandra
Liebe Sandra, vielen Dank für deinen lieben Kommentar. Ja es dauert schon länger als ein paar Eier ins Färbebad plumpsen zu lassen. Aber es macht echt Spaß. Ich finde es noch total schwierig eine Gleichmäßigkeit aufs Ei zu bekommen. Aber Übung macht den Meister. Hoffe du hast noch einen Moment gefunden. Liebe Grüße Tobia